The Terraform Beginner Bootcamp
Welcome to space, and I genuinely hope you discover something of value here—no doubt.
The curriculum was gradually developed, using a branch and tag-based approach, and eventually condensed into week-based timeframe, aligning with the designed methodology.

To make the most of the following architecture, I strongly encourage you to follow the designated numerical branching in the given order.
If you ever visit my branches, you’ll notice that each click reveals distinct content pertaining to the specific technology, e.g., being taught. This is an idea I first conceived and elaborated on here.

Starting with this one!
Week Minus One and Paving the Way
It’s essential to note that the bootcamp did not start at this stage.
📂 terraform-beginner-bootcamp-2023
  ├─ 📂 introduction
  ├─ 📂 week0-bprep
  ├─ 📂 week0-pprew
  ├─ 📂 week1-building
  ├─ 📂 week2-connecting
  ├─ 📂 week3-catchup
  └─ 📂 week4-the-end
We had a preceding phase known as the “Bootcamp Prep Week” prior to Week 0.
Tasks like signing in or up for multiple platforms and becoming familiar with basic capabilities;
- Understanding the Role: Clarified the expectations and responsibilities of a Cloud Engineer for the upcoming project.
- Template Adoption: Implemented the ExamPro initial template for project.
- Access to Discord: Successfully gained access to the Discord communication platform.
- Effective Questioning Skills: Learned and aAcquired the skill of asking pertinent questions.
- Markdown Mastery: Demonstrated more proficiency in Markdown for creating well-structured developer content.
- Git and GitHub Proficiency: Strengthened knowledge and skills in Git and GitHub, essential for version control and collaborative coding.
- Git Graph Use: Used Git Graph for visualizing and managing the project when branching, and tagging.
- Terraform Cloud Familiarity: Initiated the journey with Terraform Cloud for our IaC.
- Jumpad Registration: Signed up for Jumpad, the local alternative for Gitpod, codespaces or any.
Table Of Contents
- The Terraform Mastery Journey
- Simplifying Terraform CLI Configuration
- Harnessing the Power of Environment Variables
- Listing Your Environment Variables
- Efficient Workspace Management in Gitpod
- Understanding Gitpod-Provided Environment Variables
- Assigning Environment Variables in Bash
- Creating a .env File
- Installing AWS CLI for Quick Interaction
- Verifying Your AWS CLI Configuration
- Resolving the Unauthenticated Issue
- Configuring AWS IAM Users
- Optimizing Your AWS CLI Script
- Unlocking Terraform’s Essentials
- Provisioning S3 Buckets with Terraform
- Transitioning to Terraform Cloud
- Gitpod Terraform Cloud Authentication
- Creating a Terraformer Alias
- Week Cipher Conquests
Week Zero Is The Way — SemVer
Week zero kicked off with a focus on more on branching, ticket management, and tagging, all in alignment with semantic versioning.
Semantic Versioning is a scheme for software that helps developers convey meaningful information about the changes in their code lets say e.g.
| Version | Meaning |
|---|---|
| 1.0.0 | Initial release |
| 1.1.0 | Added new features, backward-compatible |
| 1.1.1 | Bug fix, backward-compatible |
| 2.0.0 | Incompatible changes, significant upgrade |
| 2.0.1 | Bug fix, backward-compatible |
| 2.1.0 | Added new features, backward-compatible |
| 3.0.0-alpha.1 | Pre-release version, not stable for production |
| 3.0.0-beta.1 | Pre-release version, for testing and feedback |
| 3.0.0 | Stable release, backward-compatible |
To implement SemVer properly in Git, you should follow these guidelines:
- Set Up a Repository: If you don’t already have a Git repository for your project, create one by initing the .git dir
git init -
Define Your Version Number: Start by defining your initial version number. SemVer follows the format
MAJOR.MINOR.PATCH, where:MAJORis incremented for significant, backward-incompatible changes.MINORis incremented for backward-compatible new features or improvements.PATCHis incremented for backward-compatible bug fixes.
For example, if your project is at version 1.0.0, you might start with:
git tag 1.0.0
- Commit Your Changes: Commit your changes as usual. Make sure that each commit message is descriptive and follows a conventional format, which includes a summary and, if needed, a detailed description.
git commit -m "feat: Add new feature X" git commit -m "fix: Fix issue Y" git commit -m "chore: Update dependencies" - Bump Version Numbers: When you’re ready to release a new version, update the version number accordingly in your project. For example, if you’re releasing a minor version, update the
MINORnumber:git tag 1.1.0 - Write a Changelog: Create a changelog that details the changes in this release, including new features, bug fixes, and any other noteworthy items. This helps users understand what has changed between versions.
- Push to Git: Push your changes and tags to your Git repository:
git push origin master --tags - Release Workflow: You can implement a release workflow that automates the process of updating the version number and creating a changelog. Various tools and scripts are available to help with this, such as standard-version, semantic-release, or your custom scripts.
standard-version: A popular tool for automating versioning and changelog generation. You can install it via npm:
npm install -g standard-version
Then, you can run it after your changes are ready for release:
standard-version
semantic-release: A more comprehensive tool that automates the entire release process, including versioning, changelog generation, and publishing to package registries.
- Publish Your Release: If your project is a library or package, you may want to publish it to a package registry like npm, PyPI, or others.
If your code is already on GitHub, simply push it to your remote.
git push --tags
This was 0.1.0 where I show you how to adhere to the SemVer principles.
Conluding SemVer;
- Ensures that your version numbers convey meaningful information about your software’s changes and compatibility.
- Facilitates collaboration among team by providing a standardized versioning approach.
Also great bootcampers have devised the following to exhibit our project’s workflow.
Semantic Versioning helps you and your friends understand the impact of updates at a glance.
| DEVELOPERS— | You are encouraged to follow SemVer |
|---|---|
| So, | You provide a consistent and reliable experience! |
Streamlining Terraform CLI Setup
We began our journey by identifying the Linux distribution we were using, specifically Ubuntu, and determined this by inspecting the system file.
We did it just here.
Further, the cli failed due to the following.
The point of concern was this line of code:
sudo apt-add-repository "deb [arch=amd64] https://apt.releases.hashicorp.com $(lsb_release -cs) main"
To enhance it, we modified it as follows:
sudo apt-add-repository "deb [arch=amd64] https://apt.releases.hashicorp.com $(lsb_release -cs) main" -y
Next, we consulted the official Terraform documentation to acquire the correct installation instructions:
https://developer.hashicorp.com/terraform/tutorials/aws-get-started/install-cli
We meticulously followed these instructions one by one, resulting in successful installation.
See this asset to observe the comparison.
Subsequently, we transformed these steps into a Bash script, located at ./bin/here
Automate the Script
In the context of Gitpod, we simplified the setup step within the workflow from:
    init: |
      sudo apt-get update && sudo apt-get install -y gnupg software-properties-common curl
      curl -fsSL https://apt.releases.hashicorp.com/gpg | sudo apt-key add -
      sudo apt-add-repository "deb [arch=amd64] https://apt.releases.hashicorp.com $(lsb_release -cs) main"
      sudo apt-get update && sudo apt-get install terraform
To just;
    init: |
     source ./bin/install_terraform_cli
Furthermore, we established a solution to address the scenario where initializing occurs only when starting a new workspace:
| Scenario | Initialization |
|---|---|
| When starting a new workspace | init |
| Launching an existing workspace | No init |
Solution;
Use either the before or command directive as shown below:
    before: |
     source ./bin/install_terraform_cli
Linux Permissions
Take the file, make it executable and associate it with the current user.
chmod u+x ./bin/install_terraform_cli
Or follownig this number:
chmod 744 ./bin/install_terraform_cli
Bash scripts start with shebang, learn more; https://en.wikipedia.org/wiki/Chmod
Execute scripts;
Use the ./ shorthand notiation to execute the bash script.
eg. ./bin/install_terraform_cli its included above.
Refer to .gitpod.yml
Considerations
Create an issue #3 that will have the number three cause;
- Our initial issue, identified as #1, was established.
- We initiated a Pull Request (PR) to implement the assigned task from that issue, which is now #2.
- Subsequently, we introduced a new issue, referenced as #3, with distinct objectives.
Effective Use of Environment Variables
We will explore various practical use cases for environment variables, providing clear and concise instructions to enhance your understanding.
I commit using an emoji :building_construction: from here;
https://github.com/ikatyang/emoji-cheat-sheet/blob/master/README.md
Looking like this 🏗️, Its use case here.
Listing Environment Variables
To easily list all environment variables in your current environment, use the following command:
env
If you need to filter and display environment variables containing a specific keyword, employ the grep command as follows:
env | grep KEYWORD
The grep command is a powerful tool for data filtering.
Managing Workspace in Gitpod
Gitpod workspaces begin at the /workspace/here directory. To avoid accidentally pushing unnecessary files to your repository, follow these steps in your bash script:
- Navigate to the workspace at the beginning of your script:
cd /workspace - After the installation is complete, return to your actual workspace repository:
cd /workspace/terraform-beginner-bootcamp
This approach ensures that your installation occurs in the correct location, with the CLI readily available.
Understanding Gitpod-Provided Environment Variables
Gitpod automatically assigns environment variables to your workspace. To access them, execute the env command and look for variables like THEIA_WORKSPACE_ROOT, which will have values like /workspace/terraform-beginner-bootcamp-2023.
You can use these variables in your scripts as shown below:
cd $THEIA_WORKSPACE_ROOT
Remember
- To assign an environment variable in bash, use the syntax
VARIABLE_NAME='value'. - To print the content of a specific environment variable, employ the
echo $envformat.
Assigning Environment Variables in Bash
You can manually assign environment variables within your bash script. Follow these steps:
- At the top of your script, define the variable:
PROJECT_ROOT='/workspace/terraform-beginner-bootcamp-2023' - Use the variable as needed in your script:
cd $PROJECT_ROOT - Alternatively, you can assign the variable when executing the script:
PROJECT_ROOT='/workspace/terraform-beginner-bootcamp-2023' ./bin/install_terraform_cli - Or export it within your environment:
export PROJECT_ROOT='/workspace/terraform-beginner-bootcamp-2023' - To persist this environment variable in Gitpod, utilize the gp env command:
gp env PROJECT_ROOT='/workspace/terraform-beginner-bootcamp-2023' - To remove the environment variable, use the unset command:
unset PROJECT_ROOT
Create Dotenv
For better organization, it’s recommended to centralize all environment variables in a dotenv file.
- Create file in the
bin/and name it.env.sample. - Add your desired environment variables to it.
Hello I am called .env - Define your project root
PROJECT_ROOT='/workspace/terraform-beginner-bootcamp-2023'You have to remove the
.samplefrom.envto make it work.
By following this approach, you can maintain a cleaner and more organized environment variable configuration in your project.
Installation of AWS CLI for Quick Interaction
In our quest to communicate swiftly and efficiently with AWS CLI, we’ve devised a streamlined installation process.
Although we’ve already incorporated it into Gitpod, we’re now taking an extra step to ensure authentication.
To achieve this, we will create a bash script named install_aws_cli within the ./bin directory.
This script will contain all the necessary commands,
- Starting with the shebang declaration
- Integrating the existent instructional commands
#!/usr/bin/env bash
cd /workspace
curl "https://awscli.amazonaws.com/awscli-exe-linux-x86_64.zip" -o "awscliv2.zip"
unzip awscliv2.zip
sudo ./aws/install
cd $PROJECT_ROOT
We will update the environment variable to match the one previously established in our coding section.
You can find more information in the branch five labeled.
- This is how we previously executed these commands in Gitpod:
before: | cd /workspace curl "https://awscli.amazonaws.com/awscli-exe-linux-x86_64.zip" -o "awscliv2.zip" unzip awscliv2.zip sudo ./aws/install cd $THEIA_WORKSPACE_ROOT - Now, instead of duplicating this code in various places, we can simply reference our newly created script like this:
before: |
  source .bin/install_aws_cli
This approach not only simplifies our workflow but also ensures consistency and ease of maintenance.
Verifying Your AWS CLI Configuration
Before proceeding, it’s crucial to ensure that your AWS CLI is properly configured for authentication. Follow these detailed steps to confirm your setup:
- Check Your AWS CLI Authentication Status
aws sts get-caller-identity
If you see a message indicating that you are not authenticated, it’s time to address this issue.

Resolving the Unauthenticated Issue
To resolve the authentication issue, you have two options:
- follow the official AWS documentation
- Or use me as your documentation.
You can manually set your AWS CLI credentials.
These values provided here are for instructional purposes;
$ export AWS_ACCESS_KEY_ID=AKIAIOSFODNN7EXAMPLE
$ export AWS_SECRET_ACCESS_KEY=wJalrXUtnFEMI/K7MDENG/bPxRfiCYEXAMPLEKEY
$ export AWS_DEFAULT_REGION=us-west-2
Ensure you replace them with your actual
- AWS access key
- Secret key
- Preferred AWS region (Optional Pick)
Next, open your .env file that was created in again branch five.
Insert the following lines with your actual credentials:
# .env file

AWS_ACCESS_KEY_ID=YOUR_ACCESS_KEY_ID
AWS_SECRET_ACCESS_KEY=YOUR_SECRET_ACCESS_KEY
AWS_DEFAULT_REGION=YOUR_PREFERRED_REGION
AWS IAM User Configuration
- Navigate to your AWS Management Console, specifically the IAM (Identity and Access Management) section.
- Create a new IAM user, naming it “yourname-terraform-beginner-bootcamp”.
- Next, create a group of permissions and assign it to this newly created user.
Inside the IAM user settings;
- Access the “Security Credentials” tab.
- Scroll down and click “Create access key,” selecting “CLI” as the access type.
- Confirm the action without specifying a value for the next option.
Retrieve the access key and secret access key from the previous step, and assign them to your environment variables as follows:
AWS_ACCESS_KEY_ID=your_access_key_here
AWS_SECRET_ACCESS_KEY=your_secret_key_here
AWS_DEFAULT_REGION=your_region_here
- Ensure you add these variables to your CLI session using the export command:
export AWS_ACCESS_KEY_ID=your_access_key_here
export AWS_SECRET_ACCESS_KEY=your_secret_key_here
export AWS_DEFAULT_REGION=your_region_here
Making Environment Variables Persistent in Gitpod
To make these environment variables persist in your Gitpod environment, use the gp env command:
gp env AWS_ACCESS_KEY_ID=your_access_key_here
gp env AWS_SECRET_ACCESS_KEY=your_secret_key_here
gp env AWS_DEFAULT_REGION=your_region_here
Security Note
- Do Not Leave Credentials in
.env.sampleEnsure you do not include your actual AWS credentials in your .env.sample file. Security check to keep sensitive information like AWS keys out of version-controlled files.
Verify AWS CLI Authentication
Now just double-check your AWS CLI authentication by running the command:
aws sts get-caller-identity
If everything is correctly configured, you should receive a JSON payload similar to this:
{
    "UserId": "<value>",
    "Account": "<aws-id>",
    "Arn": "arn:aws:iam::<aws-id>:user/yourname-in-terraform-beginner-bootcamp"
}
Also add that at the end of the script so you can see it on gitpod launch
sudo ./aws/install
# I am Previous AWS CLI Install Instructions

aws sts get-caller-identity

cd $PROJECT_ROOT
# I am After AWS CLI Install Instructions
By following this, you’ll ensure that your AWS CLI is properly authenticated!
Refining AWS CLI Script
While re-executing the AWS CLI installation script, you might encounter a prompt requesting user input to confirm the installation if AWS CLI components already exist.
To ensure a smooth installation without user intervention, we need to modify the script accordingly. Here’s a detailed guide on how to achieve this:
1. Handling Existing AWS CLI Components
The initial concern is addressing the presence of existing AWS CLI components.
To achieve this, we can take the following steps with a simple ls on the workspace dir.
- Check if the AWS CLI zip file exists and remove it if it does.
- Check if the AWS CLI directory exists and remove it along with the zip file if found.
To overcome this, we can add logic to remove any existing components before proceeding with the installation.
We got this from GPT, here is the history
# Define the path to the AWS CLI zip file
AWS_ZIP_FILE='/workspace/awscliv2.zip'

# Check if the AWS CLI zip file exists and remove it if found
if [ -e "$AWS_ZIP_FILE" ]; then
    rm -f "$AWS_ZIP_FILE"
fi
When attempting to run the script, it remains unresponsive. We need to explore more innovative solutions to resolve this issue.
2. Assign Env Vars
Consider assigning it to an environment variable.
$AWS_ZIPPO='awscliv2.zip'
if [ -e "/workspace/$AWS_ZIPPO" ]; then
    rm -f "/workspace/$AWS_ZIPPO"
fi
Despite attempting another approach, the issue persists, and the script is still not functioning correctly.
3. GPT is Average
Let’s investigate Stack Overflow using the ‘dev null’ approach: https://stackoverflow.com/questions/31318068/how-to-write-a-shell-script-to-remove-a-file-if-it-already-exists
We performed a basic ls command to discover that the installation process created an ‘aws’ directory in addition to the zip file.
The straightforward solution is to delete both the directory and the zip file.
This can be accomplished after navigating to our workspace.
rm -f '/workspace/awscliv2.zip'
rm -rf '/workspace/aws'
It should function smoothly.
This step may seem insignificant, but it can be quite beneficial for beginners to get going.
I used to see this as china. Look at me now. I’m rocking.
Thats it for this! See u soon.
Terraform Basics
We explored the fundamentals of Terraform, a powerful infrastructure as code (IaC) tool.
We began by navigating to the Terraform Registry at https://registry.terraform.io to access essential resources and modules.
Provider vs. Module: We discussed the distinction between a provider and a module in Terraform.
- Providers are responsible for managing resources
- While modules serve as reusable building blocks for your infrastructure.
Goals
Our primary objectives for this bootcamp include:
- Creating a custom provider(which is something very hard but cool to do)
- Developing a module, a fundamental Terraform construct. (normal)
Calling a Provider From Registry
We initiated our journey by employing the random provider, which enables us to generate random values.
You can find this provider at hashicorp/random.
Provider and Resource Configuration
- We declared the
randomprovider in our main Terraform configuration file as follows:
terraform {
  required_providers {
    random = {
      source = "hashicorp/random"
      version = "3.5.1"
    }
  }
}
provider "random" {
  # Configuration options
}
Note: The main.tf configuration file is considered the top root module in Terraform, and we are continually building modules within it.
| 💡 | We are technically making modules all the time |
|---|---|
| 💡💡 | coding main.tf is a terraform module work. |
- Resource Creation: We created a random resource named “bucket_id” put it below the provider code:
resource "random_id" "bucket_id" { keepers = { # Generate a new id each time we switch to a new AMI id ami_id = var.ami_id } } - Naming Conventions: Rename the resource to “bucket_id” for clarity.
- Navigate to the Terraform Registry and click on the “Documentation” tab located in the left-hand side second navbar, adjacent to the “Use Provider” button.
- Proceed to the “Resources” section and select the desired resource. Place this chosen resource immediately below the previously mentioned one.
resource "random_id" "name" { keepers = { # Generate a new id each time we switch to a new AMI id ami_id = var.ami_id } -
Assign the name
bucket_idto the resource to align it with our specific use case. - Navigate to the resource section and select the specified simple resource. Place it directly underneath the previous resource.
resource "random_id" "bucket_name" {
  keepers = {
 # Generate a new id each time we switch to a new AMI id
 ami_id = var.ami_id
  }
Looks Mh. I think we can try this with a random string.
Expanding Resources
To enhance our resources, we added a random string generator instead.
- Located the “random string” resource in the Terraform Registry, then replaced the existing resource with the following code:
resource "random_string" "bucket_name" { length = 16 special = true override_special = "" - from
override_special =take the"/@£$"as we dont need.resource "random_string" "bucket_name" { length = 16 special = true override_special = "" } - Or just go back to this and put special to false and just delete the
override_specialinstead:resource "random_string" "bucket_name" { length = 16 special = false }
Add outputs
- Add an output block to return the random string value and name it with our bucket_name
output "" {} - For the value assign it the
idofbucket_nameof thatrandom_stringoutput "random_bucket_name" { value = random_string.bucket_name.id } - Additionally, let’s verify whether it returns a different value or remains consistent.
output "random_bucket_name" { value = random_string.bucket_name.result }
Code the above output block in ur output.tf.
Pre-Verify
👇 Make sure the file looks like this before actually testing terraform;
terraform {
required_providers {
random = {
source = "hashicorp/random"
version = "3.5.1"
}
}
}
provider "random" {
# Configuration options
}
resource "random_string" "bucket_name" {
  length           = 16
  special          = false
}
output "random_bucket_name" {
 value = random_string.bucket_name.id
}
output "random_bucket_name" {
 value = random_string.bucket_name.result
}
If so, nice let’s go ahead.
Terraform Workflow
We reviewed essential Terraform commands and workflow steps.
Initialization
We executed terraform init, which after observation I am concluding:
- Created a
.terraformdirectory for Terraform configuration. (Downloaded the required provider binary) - Generated a
terraform.lock.hclfile to lock the provider version. - The asset below shows the apply; focus on the dot terraform folder to earn its purpose.
If you are going for the certification, I already did a year or something ago. Try to remmember the path registry.terraform.io comes a lot.
Planning
We ran terraform plan to preview the infrastructure changes.
Terraform will perform the following actions:

  # random_string.bucket_name will be created
  + resource "random_string" "bucket_name" {
      + id          = (known after apply)
      + length      = 16
      + lower       = true
      + min_lower   = 0
      + min_numeric = 0
      + min_special = 0
      + min_upper   = 0
      + number      = true
      + numeric     = true
      + result      = (known after apply)
      + special     = false
      + upper       = true
    }

Plan: 1 to add, 0 to change, 0 to destroy.

Changes to Outputs:
  + random_bucket_name_id     = (known after apply)
  + random_bucket_name_result = (known after apply)
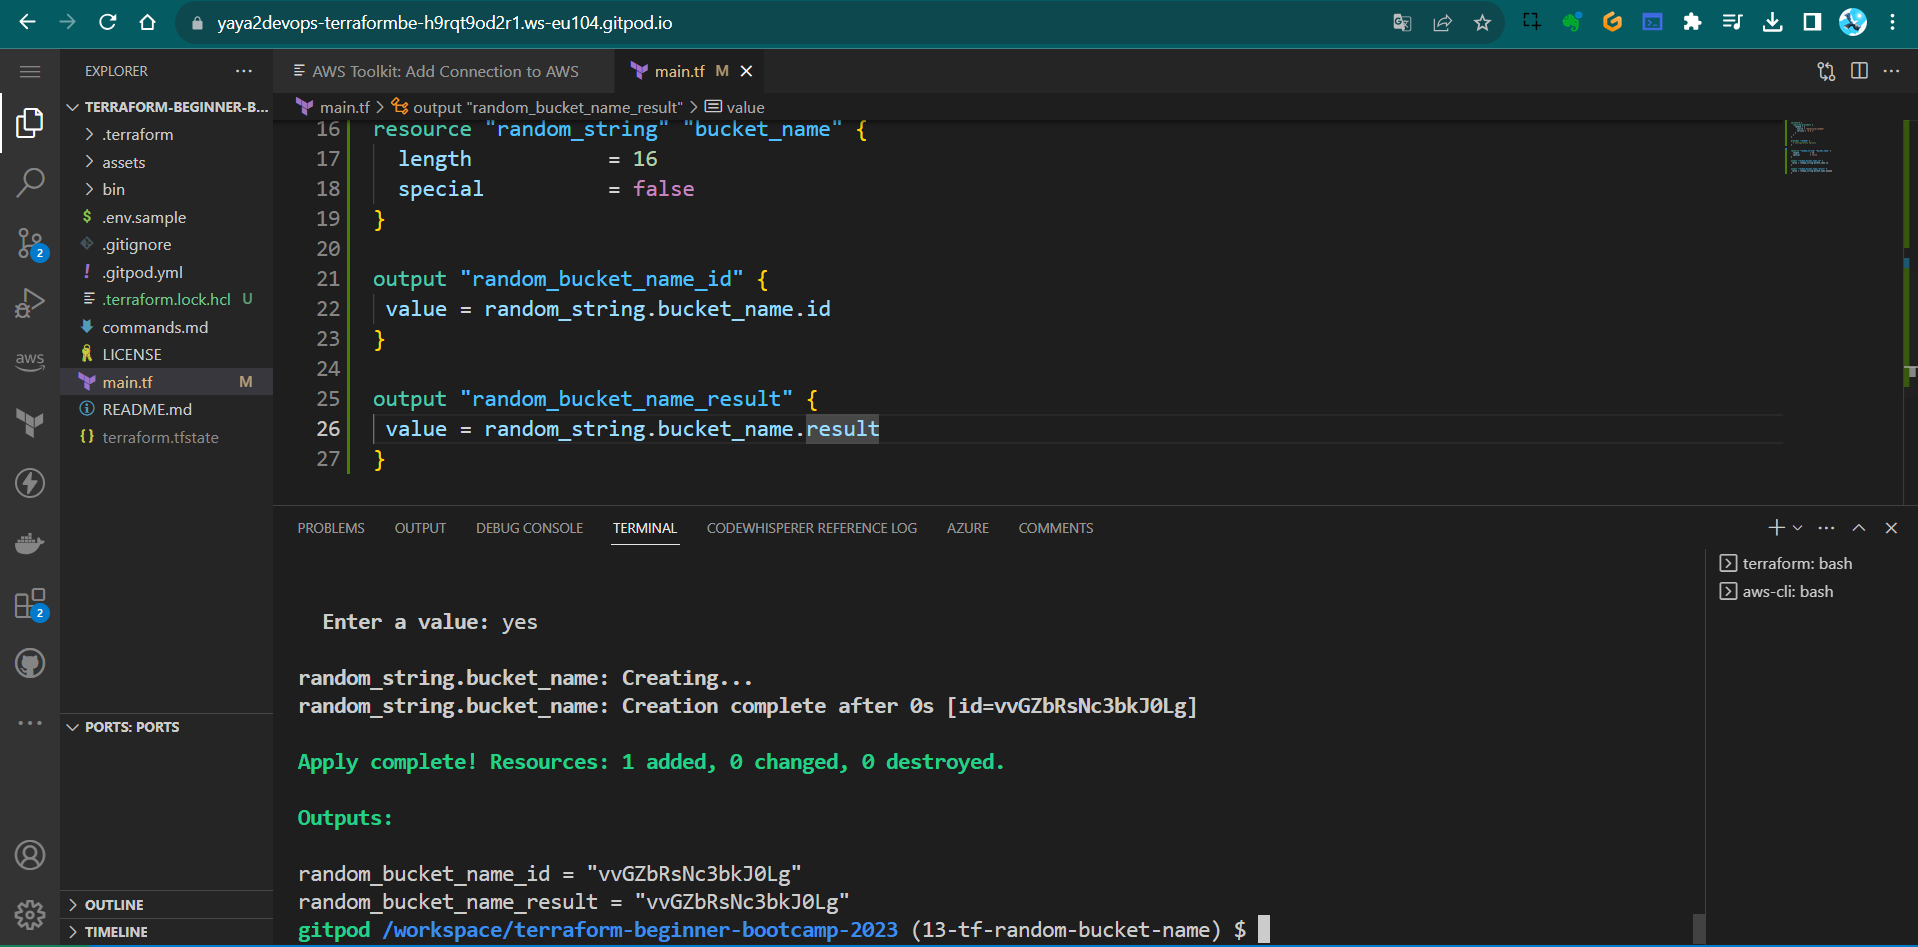
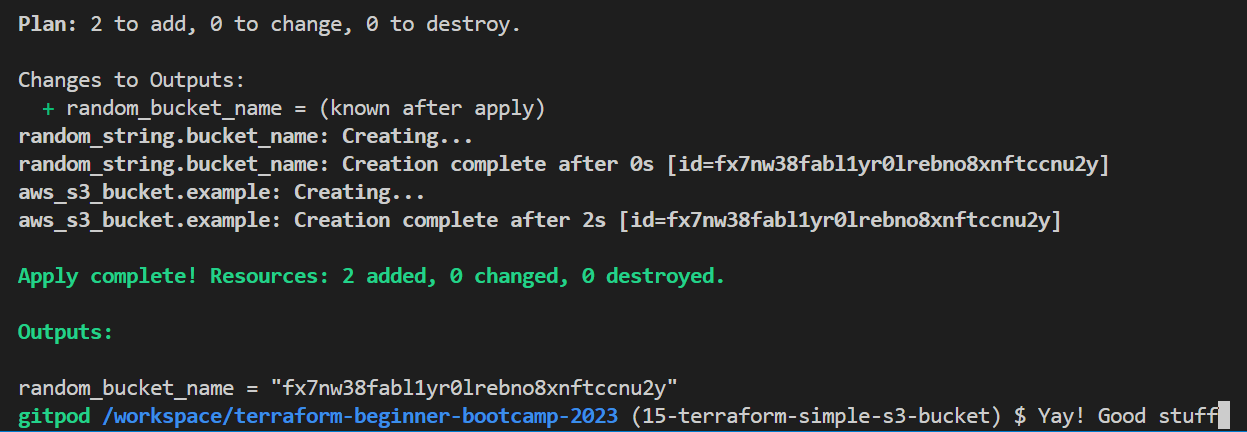
Apply
- Using
terraform apply, we applied the configuration, which returned the specified outputs.Outputs: random_bucket_name_id = "vvGZbRsNc3bkJ0Lg" random_bucket_name_result = "vvGZbRsNc3bkJ0Lg" - Go ahead and delete the id line, I prefer the result. Make sure output looks like that;
output "random_bucket_name_result" { value = random_string.bucket_name.result } - Try terraform plan, this step will referesh the state
random_string.bucket_name: Refreshing state... [id=vvGZbRsNc3bkJ0Lg]

Changes to Outputs:
  - random_bucket_name_id     = "vvGZbRsNc3bkJ0Lg" -> null

You can apply this plan to save these new output values to the Terraform state, without changing any real
infrastructure.
- Run terraform apply as follow to not have to confirm with Yes.
terraform apply --auto-approve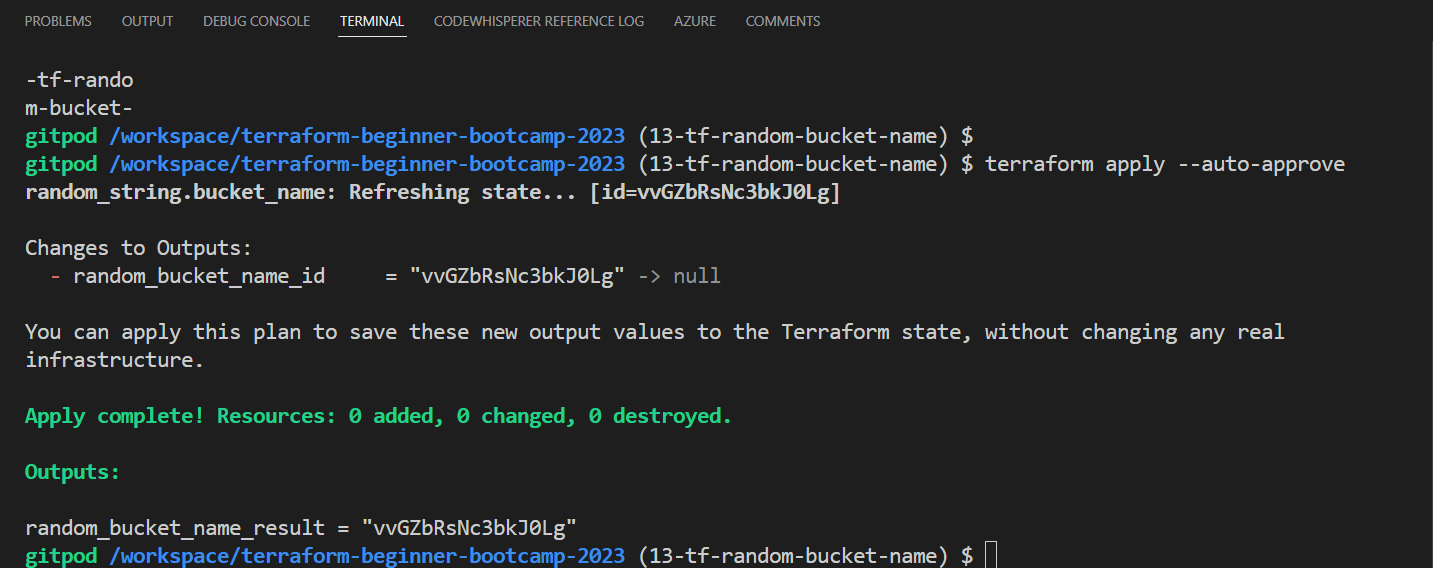
When you run a the apply you get the terraform.tfstate.
Its ignored in our .gitignore but you can see it here, tell u about ur config.
⚠️ Dont touch it pls. Only if required.
{
  "version": 4,
  "terraform_version": "1.5.7",
  "serial": 3,
  "lineage": "f275b0ef-379f-f74c-95d5-b8feac774f8c",
  "outputs": {
    "random_bucket_name_result": {
      "value": "vvGZbRsNc3bkJ0Lg",
      "type": "string"
    }
  },
  "resources": [
    {
      "mode": "managed",
      "type": "random_string",
      "name": "bucket_name",
      "provider": "provider[\"registry.terraform.io/hashicorp/random\"]",
      "instances": [
        {
          "schema_version": 2,
          "attributes": {
            "id": "vvGZbRsNc3bkJ0Lg",
            "keepers": null,
            "length": 16,
            "lower": true,
            "min_lower": 0,
            "min_numeric": 0,
            "min_special": 0,
            "min_upper": 0,
            "number": true,
            "numeric": true,
            "override_special": null,
            "result": "vvGZbRsNc3bkJ0Lg",
            "special": false,
            "upper": true
          },
          "sensitive_attributes": []
        }
      ]
    }
  ],
  "check_results": null
}
You should get a single random number assigned to ur variable and you are not asked to say yes.
Output Check
- Verify outputs using
terraform outputand specific output names.$ terraform output random_bucket_name_result "vvGZbRsNc3bkJ0Lg" - Try output with the name of the output e.g.

terraform output random_bucket_name_result

"vvGZbRsNc3bkJ0Lg"
Important Links To Empower You
This page is a direct outcome of the links I’ve just shared. See you soon!
(this was done in one of these)
Provision S3 Using Terraform
Amazon S3 is an object storage service like Dropbox.
You create a bucket and throw things in and access them in the cloud that’s all the idea of it.
Try BucketOps
- List all your S3 buckets, use the following command:
aws s3 ls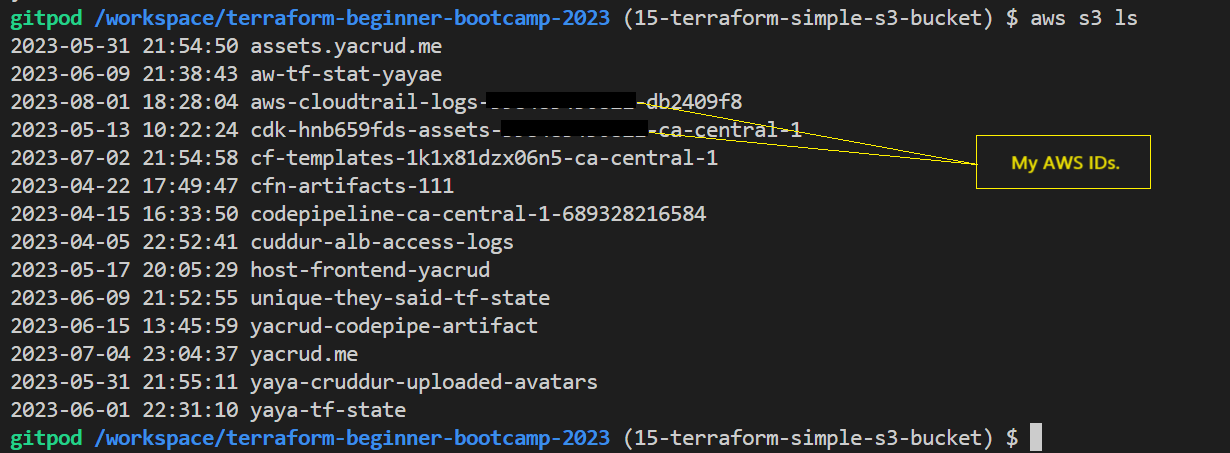
- Create a new S3 bucket, you can use the
mbwhich make bucket.aws s3 mb s3://your-bucket-nameWe will code the above command in terraform.
- Upload a File to an S3 Bucket, you can use the
cp(copy) command:aws s3 cp /path/to/local/file s3://your-bucket-name/- Replace
/path/to/local/filewith the path to the file on your local machine - Replace
your-bucket-namewith the name of your S3 bucket.
- Replace
- List all objects within a specific S3 bucket, use the following command
aws s3 ls s3://your-bucket-name/
- Download an Object from an S3 Bucket with the
cpcommand with reverse copyingaws s3 cp s3://your-bucket-name/object-key /path/to/local/directory/- Replace
your-bucket-namewith the name of your S3 bucket - Replace
object-keywith the key of the object you want to download - Replace
/path/to/local/directory/with the directory where you want to save the downloaded file.
- Replace
- Delete an Object from an S3 Bucket use the
rm(remove) commandaws s3 rm s3://your-bucket-name/object-key- Replace
your-bucket-namewith the name of your S3 bucket - Replace
object-keywith the key of the object you want to delete.
- Replace
Great and cool.
These are some basic AWS S3 commands to get you started with managing buckets and objects using the AWS CLI.
Let’s now get back to terraform and provision stuff.
Create an S3 Bucket with Terraform
First of all, the naming conventions between CloudFormation and Terraform resources may occasionally align, but this alignment is not always guaranteed. Double-check.
Prerequisites
Before we begin, ensure you have the following prerequisites:
- Terraform installed on your local machine.
- AWS credentials properly configured, either through environment variables or AWS configuration files (
~/.aws/credentialsand~/.aws/config).
We made both of these in previous branches. Double check.
Searching for S3 in Terraform Registry
To start, you need to find the AWS S3 on the Terraform Registry. You can do this by searching for ‘S3’ in the Terraform Registry.
You can find it here. If it is that hard for you to search.
Define the Terraform Resource
Now, let’s define the Terraform resource for the S3 bucket.
You can refer to this: The reference you’ve been told.
- So place this right under the random resource we did earlier.
resource "aws_s3_bucket" "example" { bucket = "my-tf-test-bucket" tags = { Name = "My bucket" Environment = "Dev" } } - Let’s temporarily remove the tags since we don’t require them at the moment.
resource "aws_s3_bucket" "example" { bucket = "my-tf-test-bucket" } - Comment it because we need to setup our AWS provider first.
- Verify by running a terraform init.
Expect a failure because;- Our random bucket naming process is generating uppercase letters
- Those mentioned are not supported as bucket names in S3.
- Verify further plan and apply?
Should fail too. We lack our AWS Provider.
Configure AWS Provider
You need to configure the AWS provider in your Terraform configuration to provide the necessary AWS credentials.
- Go to the registry and search for aws. https://registry.terraform.io/providers/hashicorp/aws/latest
- Click “USE PROVIDER” on the second navbar on the right besides Documenation;
terraform { required_providers { aws = { source = "hashicorp/aws" version = "5.17.0" } } } provider "aws" { # Configuration options } - Reflect on our previous provider.
 terraform {
   required_providers {
     random = {
       source = "hashicorp/random"
       version = "3.5.1"
     }
   }
 }

 provider "random" {
   # Configuration options
 }
How are we going to add that?
This looks stupid. 👇
terraform {
  required_providers {
    random = {
      source = "hashicorp/random"
      version = "3.5.1"
    }
  }
}

provider "random" {
  # Configuration options
}

terraform {
  required_providers {
    aws = {
      source = "hashicorp/aws"
      version = "5.17.0"
    }
  }
}

provider "aws" {
  # Configuration options
}
We must have a single block for each. So?
- Apply critical thinking and get the following results;
terraform {
  required_providers {
    random = {
      source = "hashicorp/random"
      version = "3.5.1" }

    aws = {
      source = "hashicorp/aws"
      version = "5.17.0"
    }

  }
}

provider "random" {
  # Configuration options
}

provider "aws" {
  # Configuration options
}
We had to take aws inside previous provider and put it along the random.
Go try plan the infra. It should fail.
You added a new provider it must be mapped to your .terraform dotfile.
🎯Init is required.
Initialize and Plan
- Now, you can initialize Terraform by running the following command and should work.
terraform init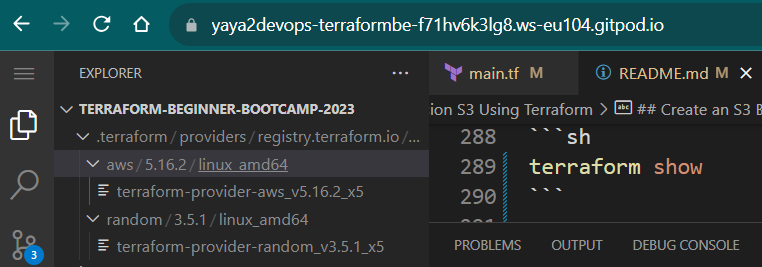
- Try running plan. Should gives ok while we both know it is not.
The random is generating the name with capital while bucket only supports low letter.
- Run
terrafom applyand observe the failure.
The plan is not smart enough.
Be careful.
You could get a green pass and then get rejected in apply.
We will address this issue next.
Fixing Bucket Naming Issue
To resolve the bucket naming issue, modify the resource definition as follows.
- Change the bucket name from that to
random_string.bucket_name.resultresource "aws_s3_bucket" "example" { bucket = random_string.bucket_name.result }Ensure you have previously defined
random_string.bucket_name.resultlike I showed you. - Update the resource definition for random as required and Set length to reduce the chance of conflicts.
From this;
resource "random_string" "bucket_name" {
  length           = 16
  special          = false
}
To that;
resource "random_string" "bucket_name" {
  lower = true
  upper = false
  length   = 32
  special  = false
}
Re-run Terraform Plan
- After fixing the issue, Run
terraform validate - Or re-run Terraform plan (it does validate in the background as a bonus):
terraform plan
This time, this also should work without errors. But we must verify further.
Terraform Apply
Once you have successfully planned, apply the changes:
terraform apply
Again.
Please be cautious;
A successful plan does not guarantee success during the apply phase.
This is works you can verify from your terminal.
You can double verify your bucket in the console.

Double Checking Terraform State
After applying the changes, check the state of Terraform with the following commands:
terraform show
You can also find it in your current directory.
   {
      "mode": "managed",
      "type": "aws_s3_bucket",
      "name": "example",
      "provider": "provider[\"registry.terraform.io/hashicorp/aws\"]",
      "instances": [
        { }
The code is around 117 lines you got the point . It is now having the bucket state.
Destroying the Bucket
Why you may ask. Because if we push the bucket will no longer be managed by Terraform’s state file, and re-importing it may be necessary.
To destroy the bucket, use the following command:

terraform destroy
Double check your terraform.tfstate
{
  "version": 4,
  "terraform_version": "1.5.7",
  "serial": 6,
  "lineage": "b17f132c-59c0-f3f6-5a4a-0d2c182bf7b5",
  "outputs": {},
  "resources": [],
  "check_results": null
}
Yep that is all it now!
Security Reminder
Never commit your AWS credentials to version control.
Keep your credentials secure and use proper AWS authentication methods.
Again;
- It’s essential never to hard code your AWS credentials in your Terraform configuration.
- Rely on AWS configuration through environment variables using the
export.
Terraform will use these credentials in the background.
Migrate To Terraform Cloud
Terraform Cloud is a powerful tool that enables you to manage your infrastructure as code securely.
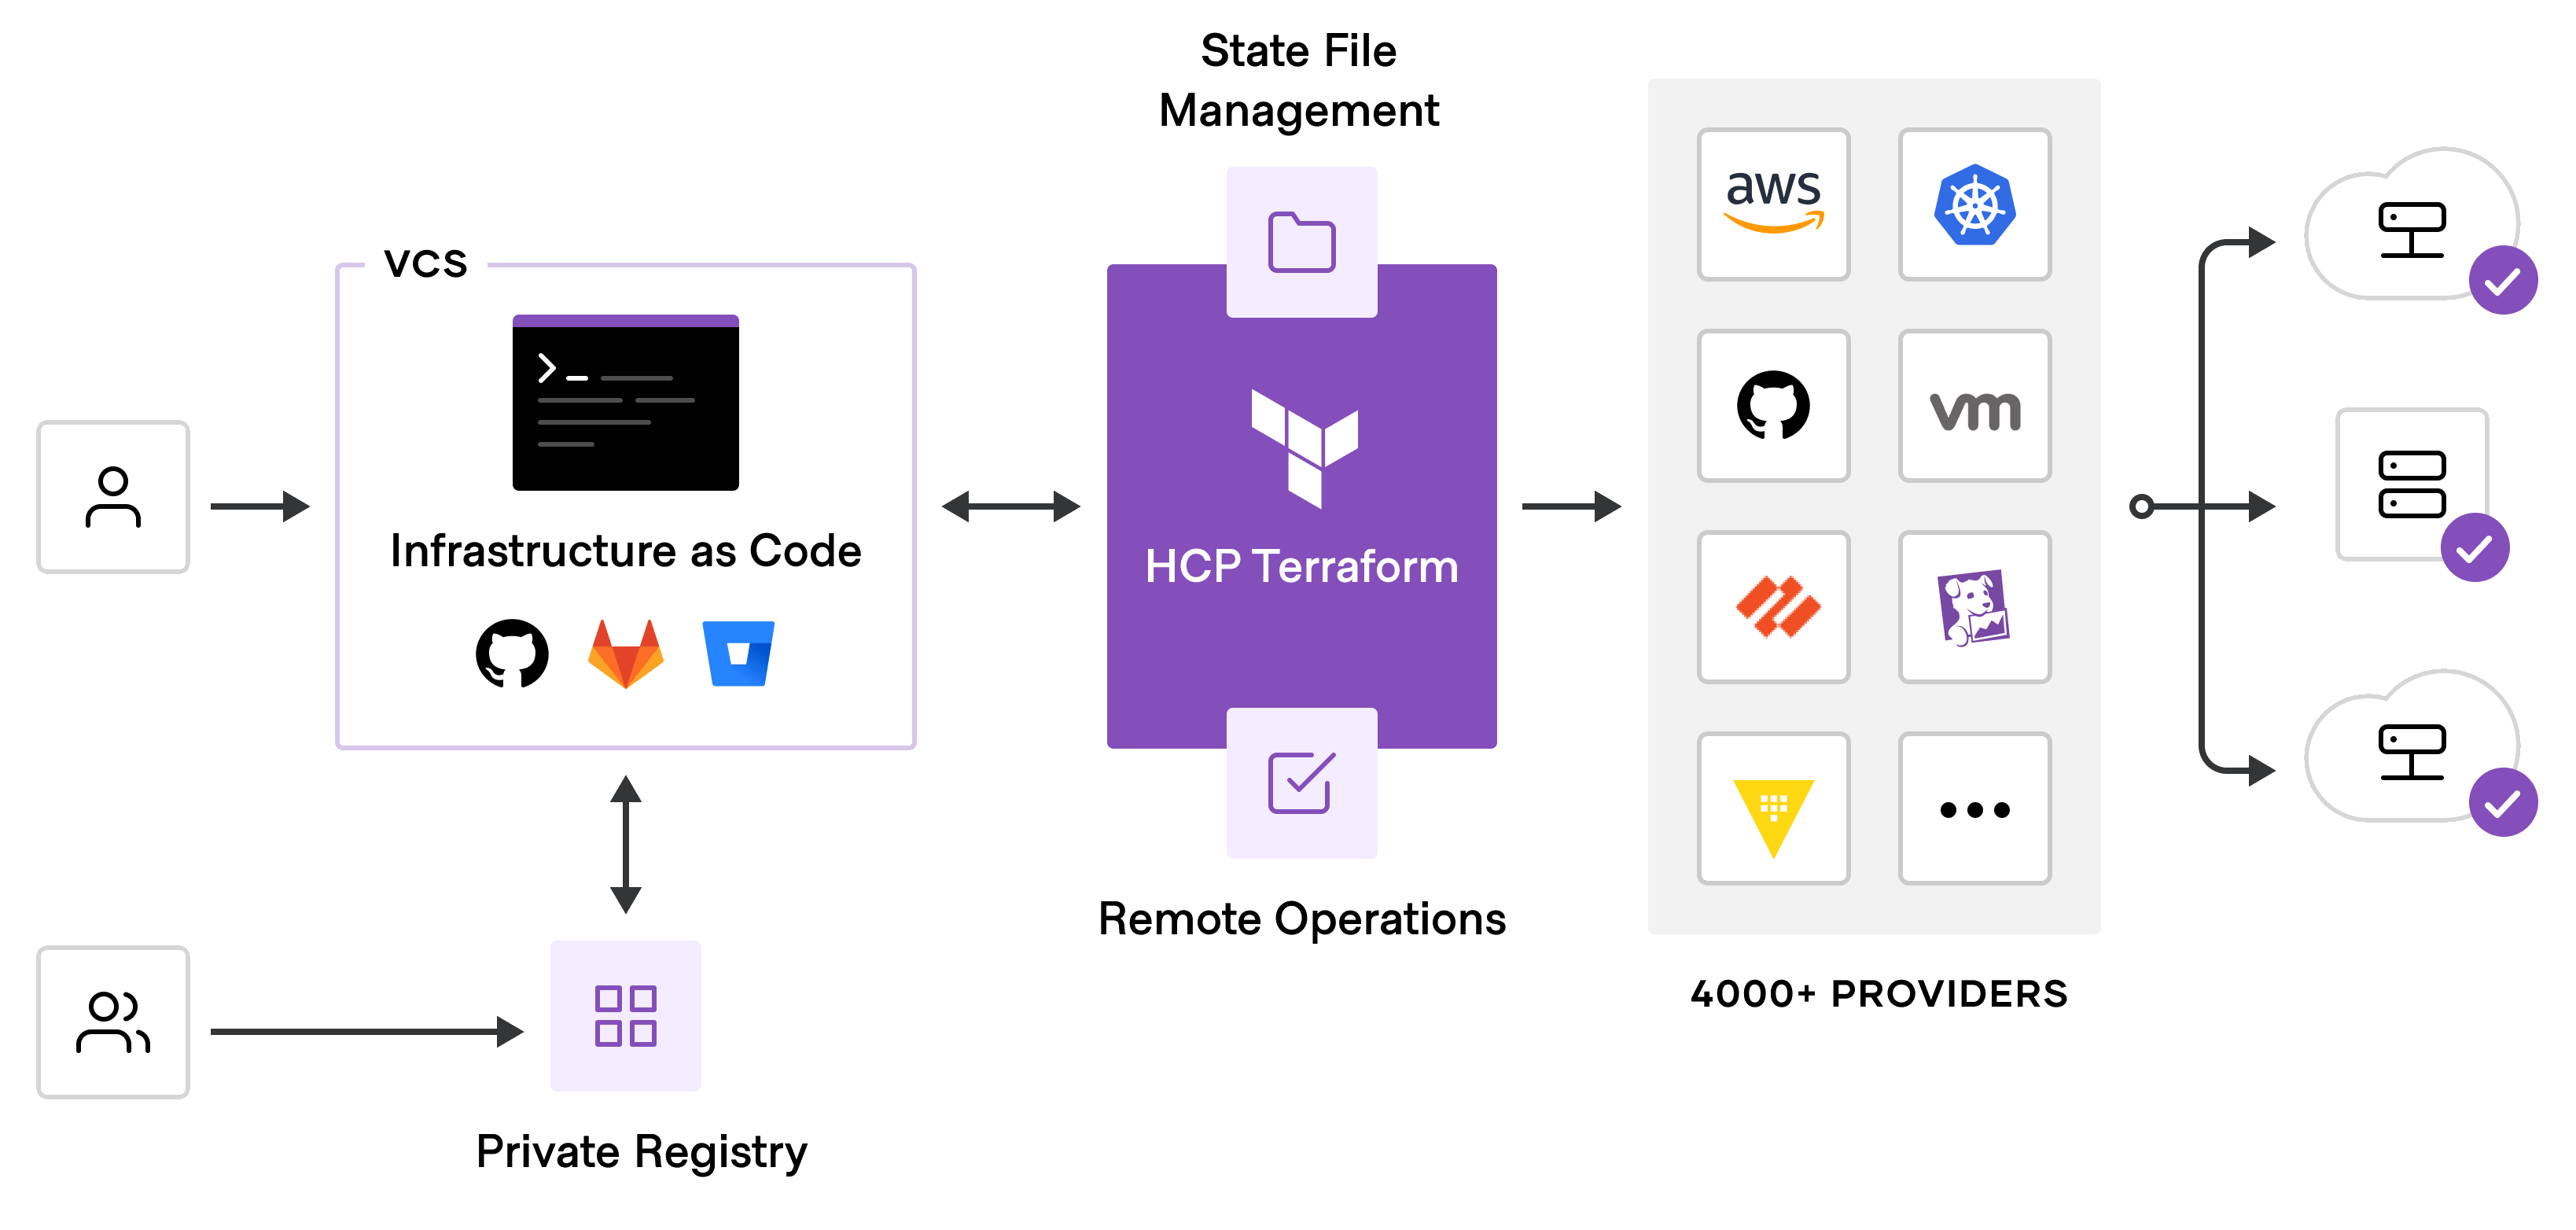
We’ll cover setting up Terraform Cloud.
You can check the pricing is dead cheap, this equals to zero.
Prerequisites
Just get the infra on again. Remember we destroyed it previously.
With simple terraform init and terraform apply.
If you are using your local. The tfdotfile is sitting there.
You can attack terraform apply directly.
Why Use Remote State Storage
The truth is we never want to responsible for that file.
We may lose it. Also We don’t want anyone to see it.
- Eliminates the risk of losing the state file
- Ensures that only authorized team members can access it.
Terraform is platform-agnostic you can store your state wherever.
- Terraform Cloud is a recommended solution because its a sponsor.
- You can store it in S3 or a container in an Azure blob.
Getting Started
When you sign up for Terraform Cloud, you’ll be prompted to create your first organization.
This link will get you started.
If you followed this, ignore the provision resource example resources.
I am your example..
Organizations and Projects and Workspaces
Terraform Cloud organizes your infrastructure into these three levels:
| 🌐 | You create the project so when u create Your workspace You can specify that project.. |
|---|---|
| ——————— |
🌐 Terraform Cloud Organization
├── 📁 Project 1
│   ├── 📁 Workspace 1.1
│   ├── 📁 Workspace 1.2
│   └── 📁 Workspace 1.3
└── 📁 Project 2
    ├── 📁 Workspace 2.1
    ├── 📁 Workspace 2.2
    └── 📁 Workspace 2.3
- Organization: The top-level entity in Terraform Cloud, which can contain multiple projects.
- Project: A collection of related Terraform configurations.
- Workspace: An isolated environment where Terraform configurations are applied and managed.
Configure Workspace Settings
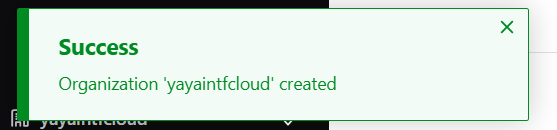
- Create an organzation and call it e.g.
yayaintfcloud.
After creating your organization, you’ll be directed to create your first workspace and to Choose from:
- Version Control Workflow (Most Common): Connect to a version control provider like GitHub.
- CLI-Driven Workflow: Trigger Terraform runs from your local command line. (most cases and ours)
- API Driven (more advanced)
I tried the first. But its not our case for now.
We want only to see stuff.
Go to the second.
Trigger remote Terraform runs from your local command line.
- You will be directed to page to create ur first workspace.
Pick a default project and create your workspace.
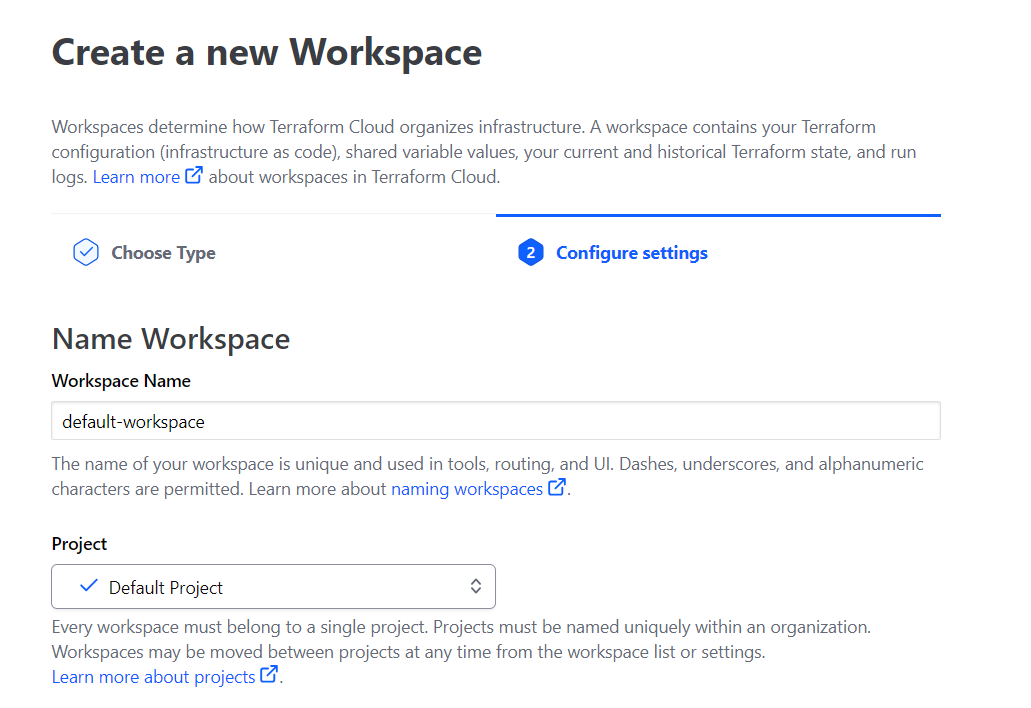
Workspace names should only contain l letters, numbers, dashes, and underscores.
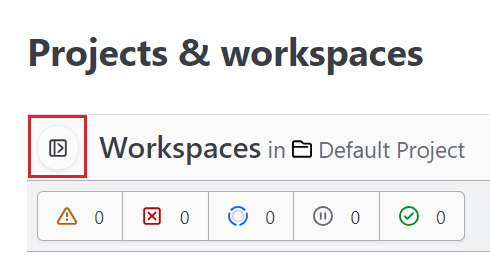
Now you should have ur workspace listed.
👇 In case you are confused. Give a click.
Create a Project
- From the top right corner, click New and select Project to create a new project for our bootcamp.
We dont have to but lets make things in its theme.
- Name our project
yaya-tf-bootcamp-2023. This will be used next.
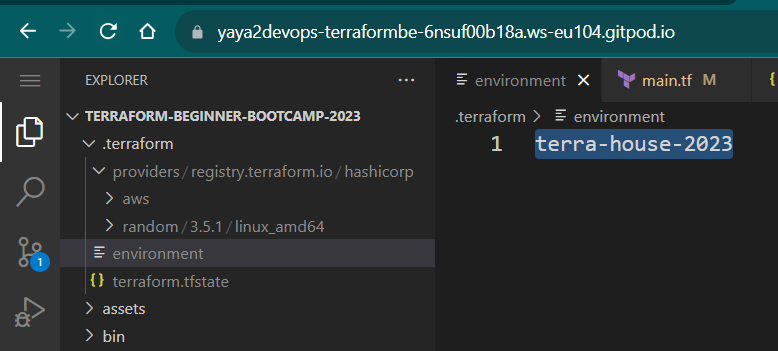
Create Your Real Workspace
We created a default workspace.
Now we will go and create the one that will apply to our bootcamp.
- from the left side, click create workspace and call it
terra-house-2023
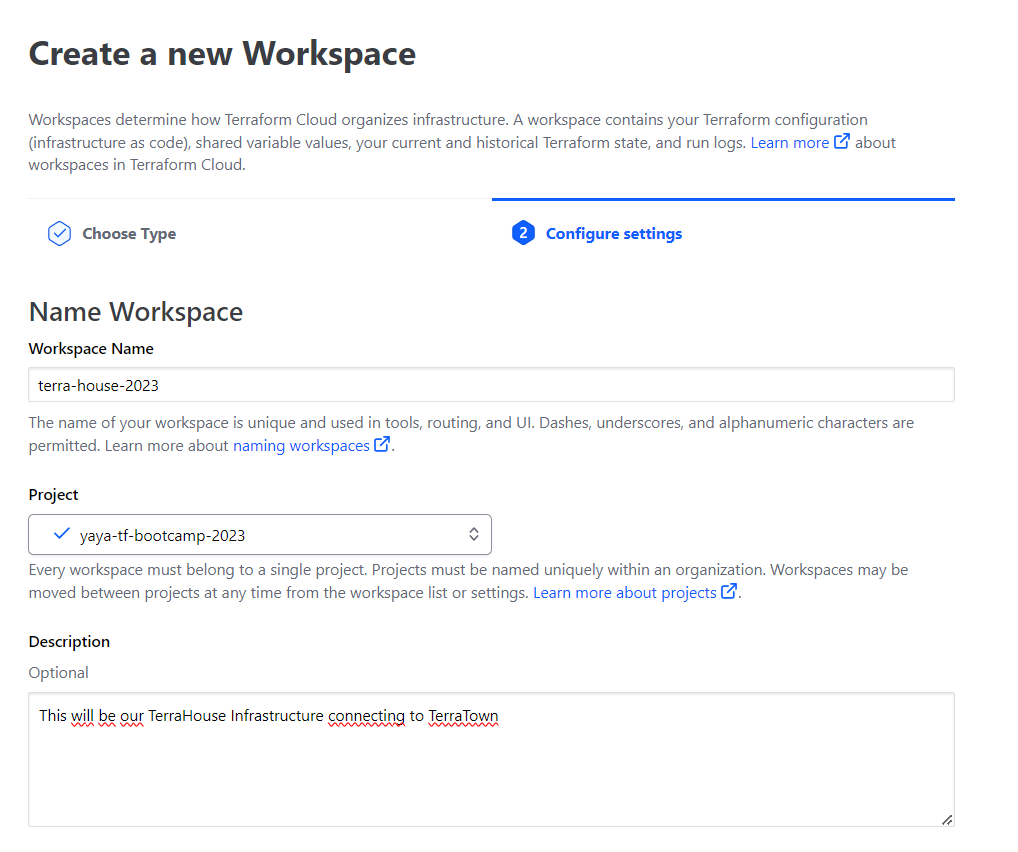
You should have your project in a good state.
- Pick your project and create your workspace.
Code the Cloud Block
Once your workspace is created, You will get that cloud block.
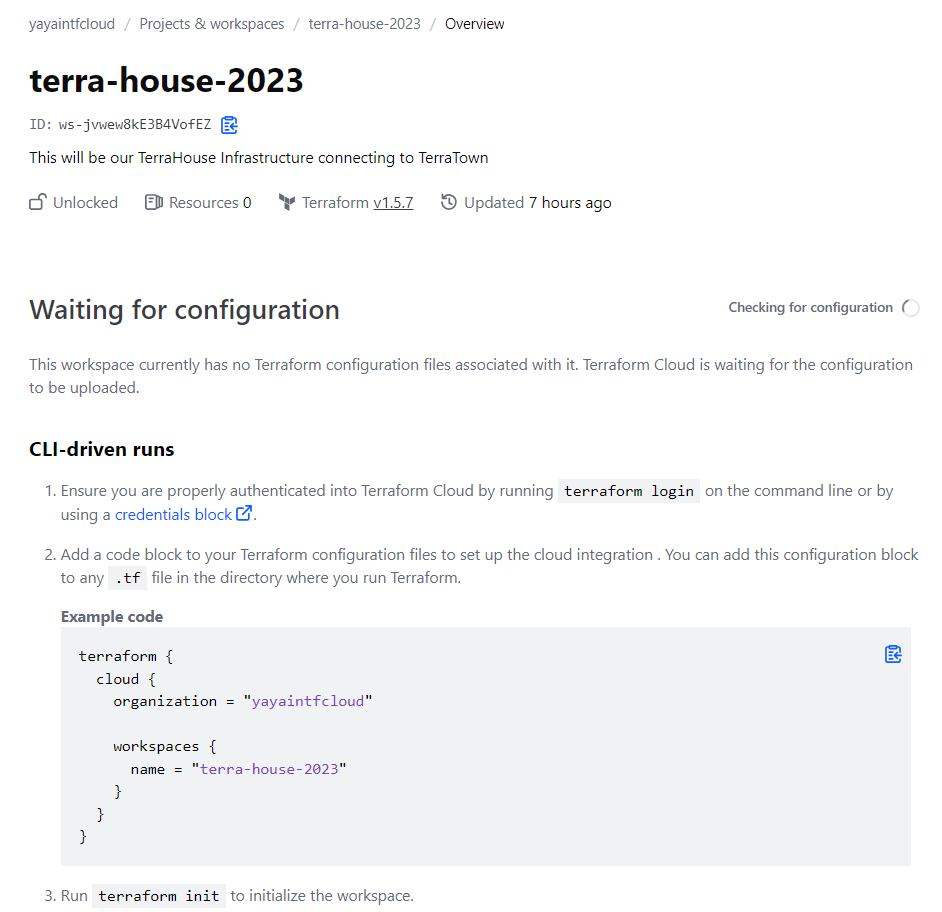
Now, let’s migrate your state to Terraform Cloud for centralized management:
- Set Up Cloud Block
  cloud {
 organization = "ORGANIZATION-NAME"
 workspaces {
   name = "learn-terraform-cloud-migrate"
 }
  }
We thought we needed the remote block but its using the cloud block.
- Observe how It was Back in the days;
backend "remote" { hostname = "app.terraform.io" organization = "yayaintfcloud" workspaces { name = "terra-house-2023" - Configure as required. Now it is more neat;
  cloud {
 organization = "yayaintfcloud"

 workspaces {
   name = "terra-house-2023"
 }
  }
Make sure its looks like this☝️
Configure TF Cloud With Gitpod using Token
(Resolved)
- Go back to your CLI and run to authenticate with terraform cloud;
terraform login - Confirm yes to create a file
You will get a stupid screen. - Click
pfor print and go to the url.
This takes you to Terraform Cloud. Here is the url;https://app.terraform.io/app/settings/tokens?source=terraform-login - Create a token and pick one for one day.
- Take the token create the file yourself.
touch /home/gitpod/.terraform.d/credentials.tfrc.json - Check the file structure in GPT but dont trust it.
- Go to reddit and get the structure instead.
 {
  "credentials": {
 "app.terraform.io": {
   "token": "<add-it-here>"
 }
  }
}
HashiCorp doesn’t even display the structure of that file. Please consider this, HashiCorp.
Openthe file that you touched it.open /home/gitpod/.terraform.d/credentials.tfrc.json- Add the content with the token you got from tf cloud.
Simple Test
To test its working.
- Run
terraform init. - Check your dotfile.
- Double check your Terraform Cloud resources;
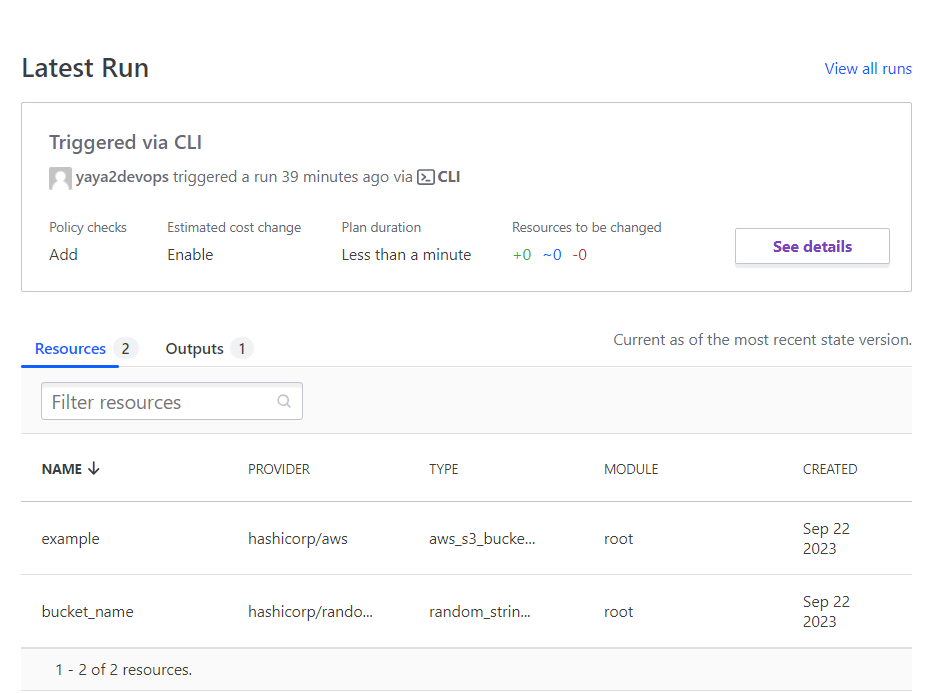
- Triple check your outputs in Terraform Cloud;

terraform.tfstateis now included in the dotfile- an environment file is created with ur tf cloud workspace.
init is now different.
- Run the
terraform initcommand.
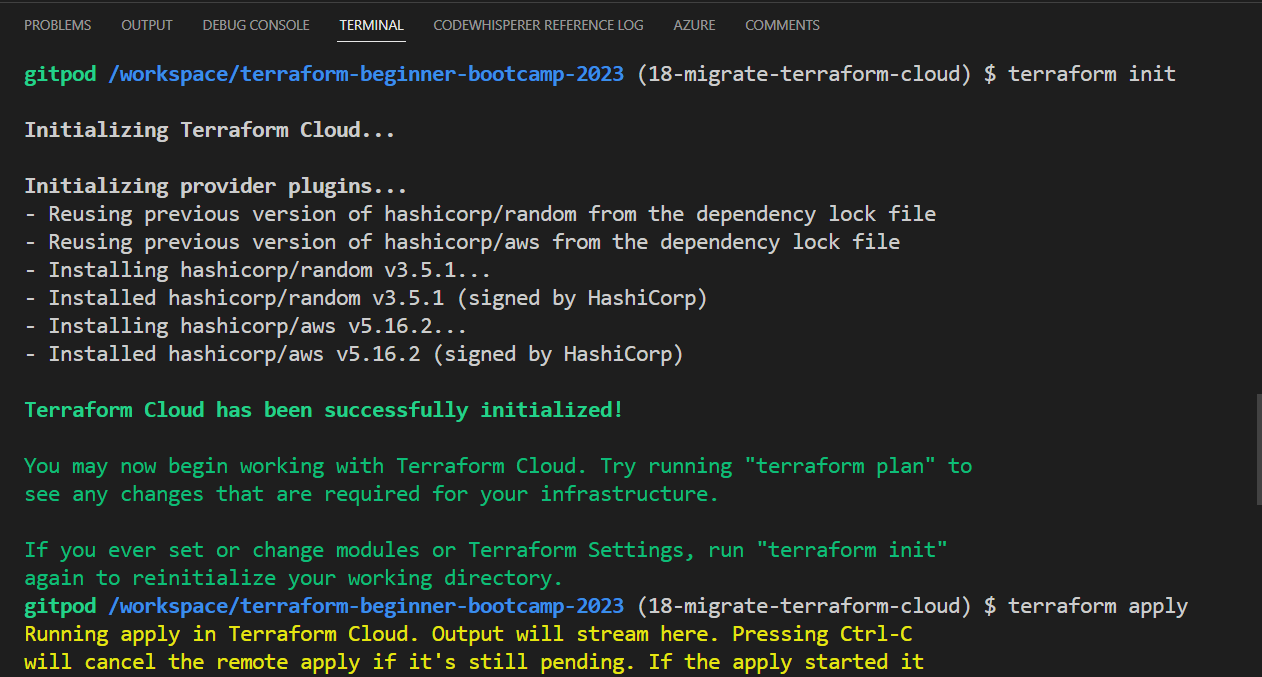
The command returns that its dealing with terraform cloud now.
Potential Actions
- Automate the process of tf login and similar steps.
- Explore the possibility of storing the token in Gitpod session storage
- Generate the necessary JSON file for the token; evaluate feasibility.
- Consider abbreviating the Terraform
Gitpod Terraform Cloud Authentication
As we previously encountered, terraform login is stuck.
We found a workaround to just;
- Make the file,
- Generate the token from terraform cloud,
- Add the content ourself.
In this, we will make a script that do just that for us.
We will then go ahead and automate it in
our .gitpod so it does it itself.
Every given time.
We will also extend the token’s validity to 30 days for added convenience.
Welcome to 0.8.0 in our Week Zero of the Terraform Beginner Bootcamp.
Design the Bash Script
- Create a file in the
/bindirectory, call itgen_tfrcand add the shebang:#!/usr/bin/env bashThis line indicates that the script should be interpreted by the Bash shell, located at
/usr/bin/env bash. - Define Target Directory and File
TARGET_DIR="/home/gitpod/.terraform.d" TARGET_FILE="${TARGET_DIR}/credentials.tfrc.json"- Define the target directory (
/home/gitpod/.terraform.d) - The target file (
credentials.tfrc.json) where the generated token will be stored.
- Define the target directory (
- Check If TERRAFORM_CLOUD_TOKEN is Set
if [ -z "$TERRAFORM_CLOUD_TOKEN" ]; then
 echo "Error: TERRAFORM_CLOUD_TOKEN environment variable is not set."
 exit 1
fi
This code checks if the environment variable
TERRAFORM_CLOUD_TOKENis set. If it’s not set (empty), the script will print an error message and exit with an error code (1). - Check If Directory Exists, If Not, Create It
if [ ! -d "$TARGET_DIR" ]; then
 mkdir -p "$TARGET_DIR"
fi
The script checks if the target directory exists and creates it if it doesn’t.
- Generate
credentials.tfrc.jsonwith the Tokencat > "$TARGET_FILE" << EOF { "credentials": { "app.terraform.io": { "token": "$TERRAFORM_CLOUD_TOKEN" } } } EOFThis code uses the
catcommand with a “here document” (« EOF) to create thecredentials.tfrc.jsonfile with the Terraform Cloud token provided by theTERRAFORM_CLOUD_TOKENenvironment variable. - Print Success Message
echo "${TARGET_FILE} has been generated."After successfully generating the
credentials.tfrc.jsonfile, a message confirming its generation is displayed. - Setting Executable Permissions
- Ensure proper permissions by using the
chmodcommand on the Bash script.chmod u+x ./bin/gen_tfrc
- Ensure proper permissions by using the
Great progress! Let’s pause for a moment.
Before proceeding, there are a few more things we need to set up.
Get The Token From Terraform Cloud
- Nav to the provided link to obtain a new token. If you can’t locate it there, you can always retrieve it from here.
https://app.terraform.io/app/settings/tokens?source=terraform-login - Extending Token Validity for our 4 weeks bootcamp
- Increase the token’s lifespan to 30 days, ensuring longer usability.

- Increase the token’s lifespan to 30 days, ensuring longer usability.
- Assigning Environment Variable for Gitpod
- Define the variable in environment variables
export TERRAFORM_CLOUD_TOKEN='YOURS-WITH-30-DAYS-HERE'
- Define the variable in environment variables
- Persist the environment variable to ensure it remains accessible within Gitpod.
gp env TERRAFORM_CLOUD_TOKEN='YOURS-WITH-30-DAYS-HERE'

I updated the
.env.examplefile with that (without revealing sensitive data) to teach you.
- We’ve extended the token’s duration.
- Our variables have been persistently stored.
✅ Eliminating the need for frequent adjustments.
- Launch your gitpod and Run the Script
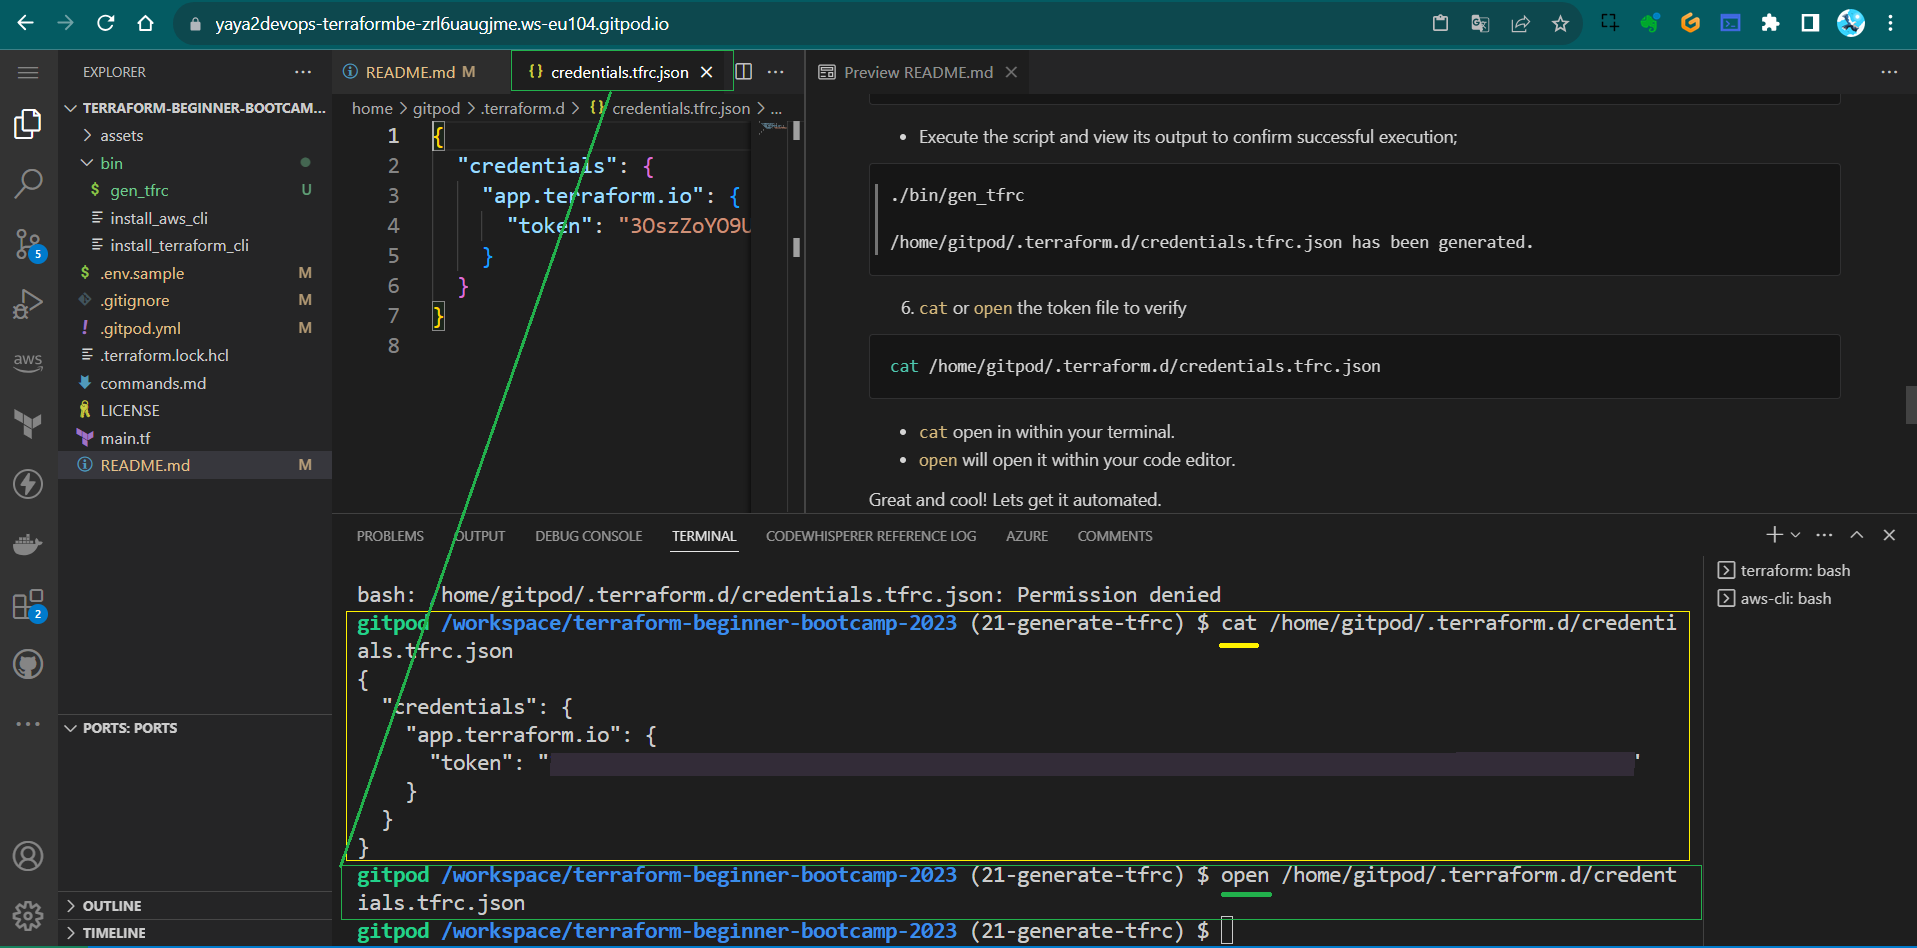
Double check if the file exist or its content to triple verify.
cat: /home/gitpod/.terraform.d/credentials.tfrc.json: No such file or directory
- Execute the script and view its output to confirm successful execution;
./bin/gen_tfrc /home/gitpod/.terraform.d/credentials.tfrc.json has been generated. catoropenthe token file to verifycat /home/gitpod/.terraform.d/credentials.tfrc.json
Great and cool! Lets get it automated.
Automating Terraform Cloud Authentication
Objective: To automate the authentication of Terraform Cloud on Gitpod workspace launch.
- Integrating the bash source to your
.gitpod
Navigate to your Gitpod configuration file and include the script source within the ‘terraform’ label aka section.
  - name: terraform
    before: |
     source ./bin/install_terraform_cli
     source ./bin/generate_tfrc
We thought it was necessary to include the script in both sections to ensure it functions correctly in both terminals. Including it in the ‘terraform’ section is sufficient.
| Resources | Description |
|---|---|
| Secrets 100 | This is my personal draft. |
| Secrets 101 | Make something out of my draft. |
| Secrets 102 | Amplify Issues, Code, Instructions. |
catopen in within your terminal.openwill open it within your code editor.
Verify by restarting your workspace to ensure that the file contains your token.
A Terraformer tf Alias
We’ll walk you through creating an alias for Terraform, making it more convenient to use.
E.g. Instead of terraform init, you can write just tf init.
We’ll cover how to manually set up the alias and create a bash script to automate the process.
Section 1 Manual Alias Setup
Step 1: Accessing Your Bash Profile
To create an alias for Terraform manually, you need to edit your Bash profile.
- Open your terminal and run the following command to access your Bash profile:
nano ~/.bash_profile - This command will open your Bash profile in the Nano text editor.
Step 2: Adding the Terraform Alias
In the Nano text editor, navigate to the end of the file.
- Add the following line to create an alias for Terraform:
alias tf="terraform" - Save your changes by pressing
Ctrl + O, then pressEnter.
Step 3: Updating Your Bash Profile
After adding the alias, you need to update your Bash profile. Run this command:
source ~/.bash_profile
Now, you have successfully set up the Terraform alias manually.
Section 2 Automating Alias Setup with a Bash Script
Step 1: Creating a Bash Script
To automate the alias setup, you can create a bash script. Here’s how:
-
Create a new file for your script using the terminal or a text editor. We’ll call it
tf_aliasin/bin/. - Open the script file for editing:
nano setup_tf_alias.sh - Inside the script file, add the following shebang to init the script:
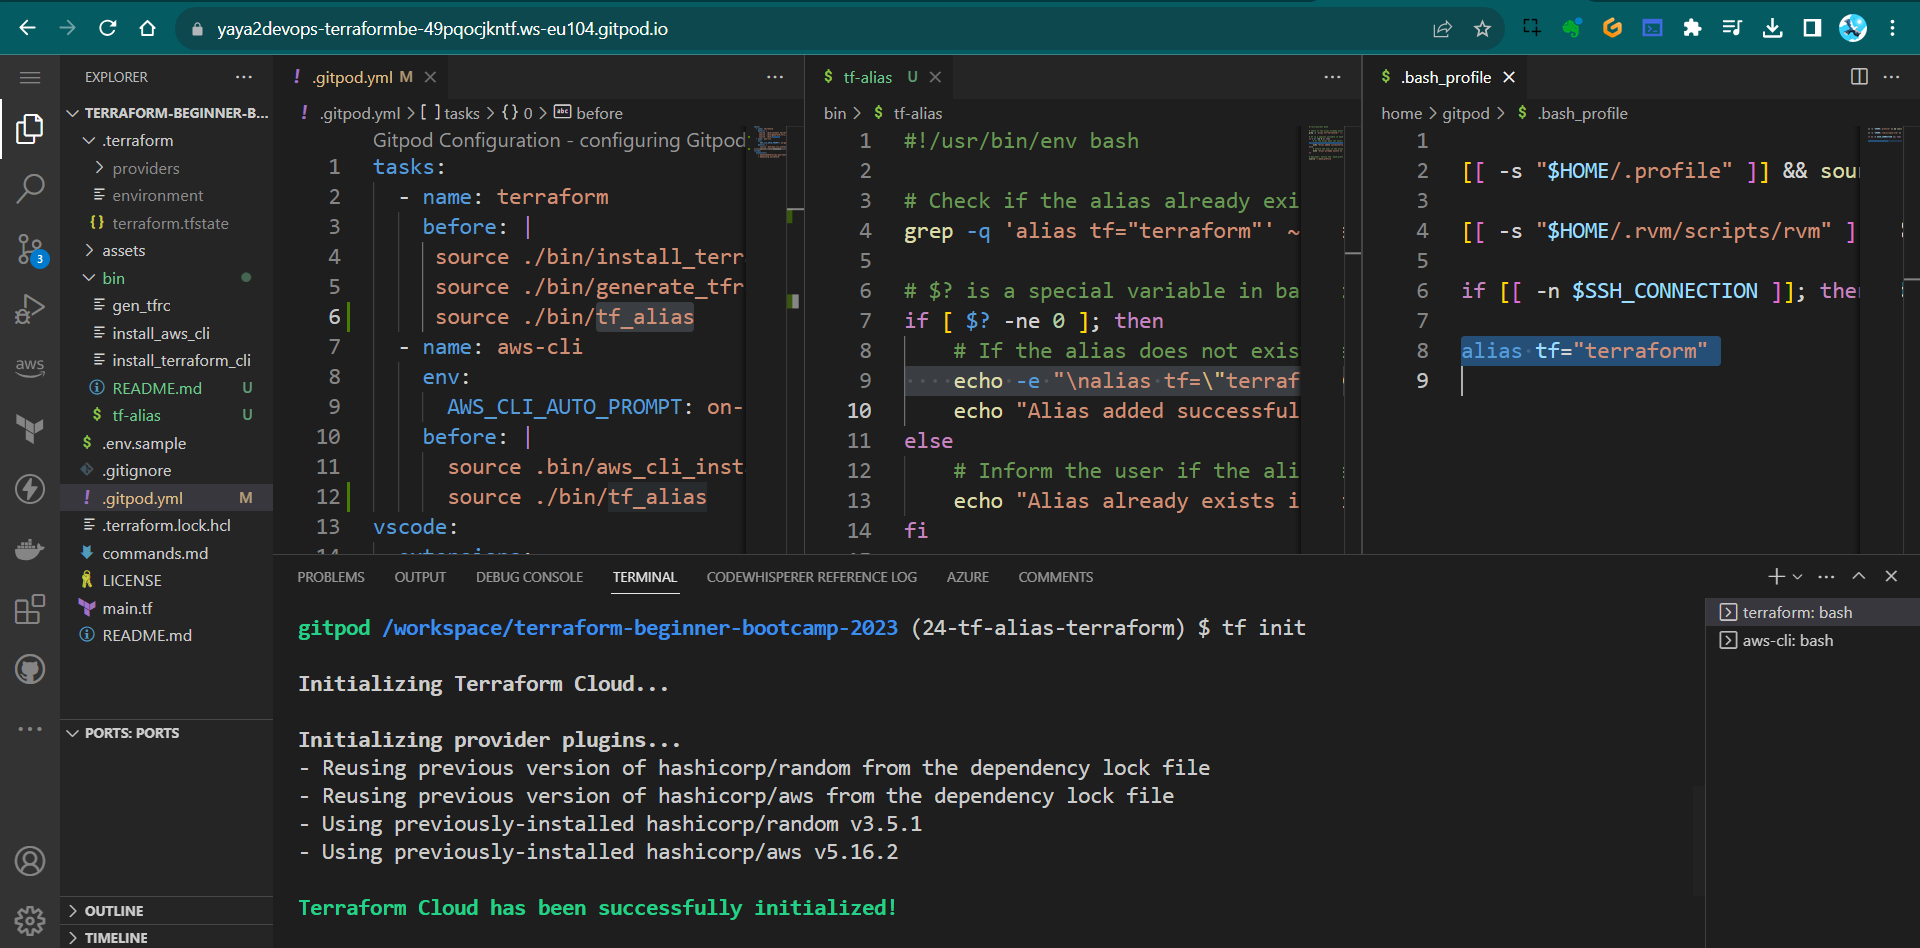
#!/usr/bin/env bash - Check if the alias already exists in the .bash_profile
grep -q 'alias tf="terraform"' ~/.bash_profile - Add the if statement and append the the allias with the following code
if [ $? -ne 0 ]; then
 # If the alias does not exist, append it
 echo 'alias tf="terraform"' >> ~/.bash_profile
 echo "Alias added successfully."
$? is a special variable in bash that holds the exit status of the last command executed
- Add the Else to Inform the user if the alias already exists
else echo "Alias already exists in .bash_profile." fi - Source the .bash_profile to make the alias available immediately
source ~/.bash_profile
For the sake of readability, the script does not perform line breaks.
I thought to update it with the following to make it so.
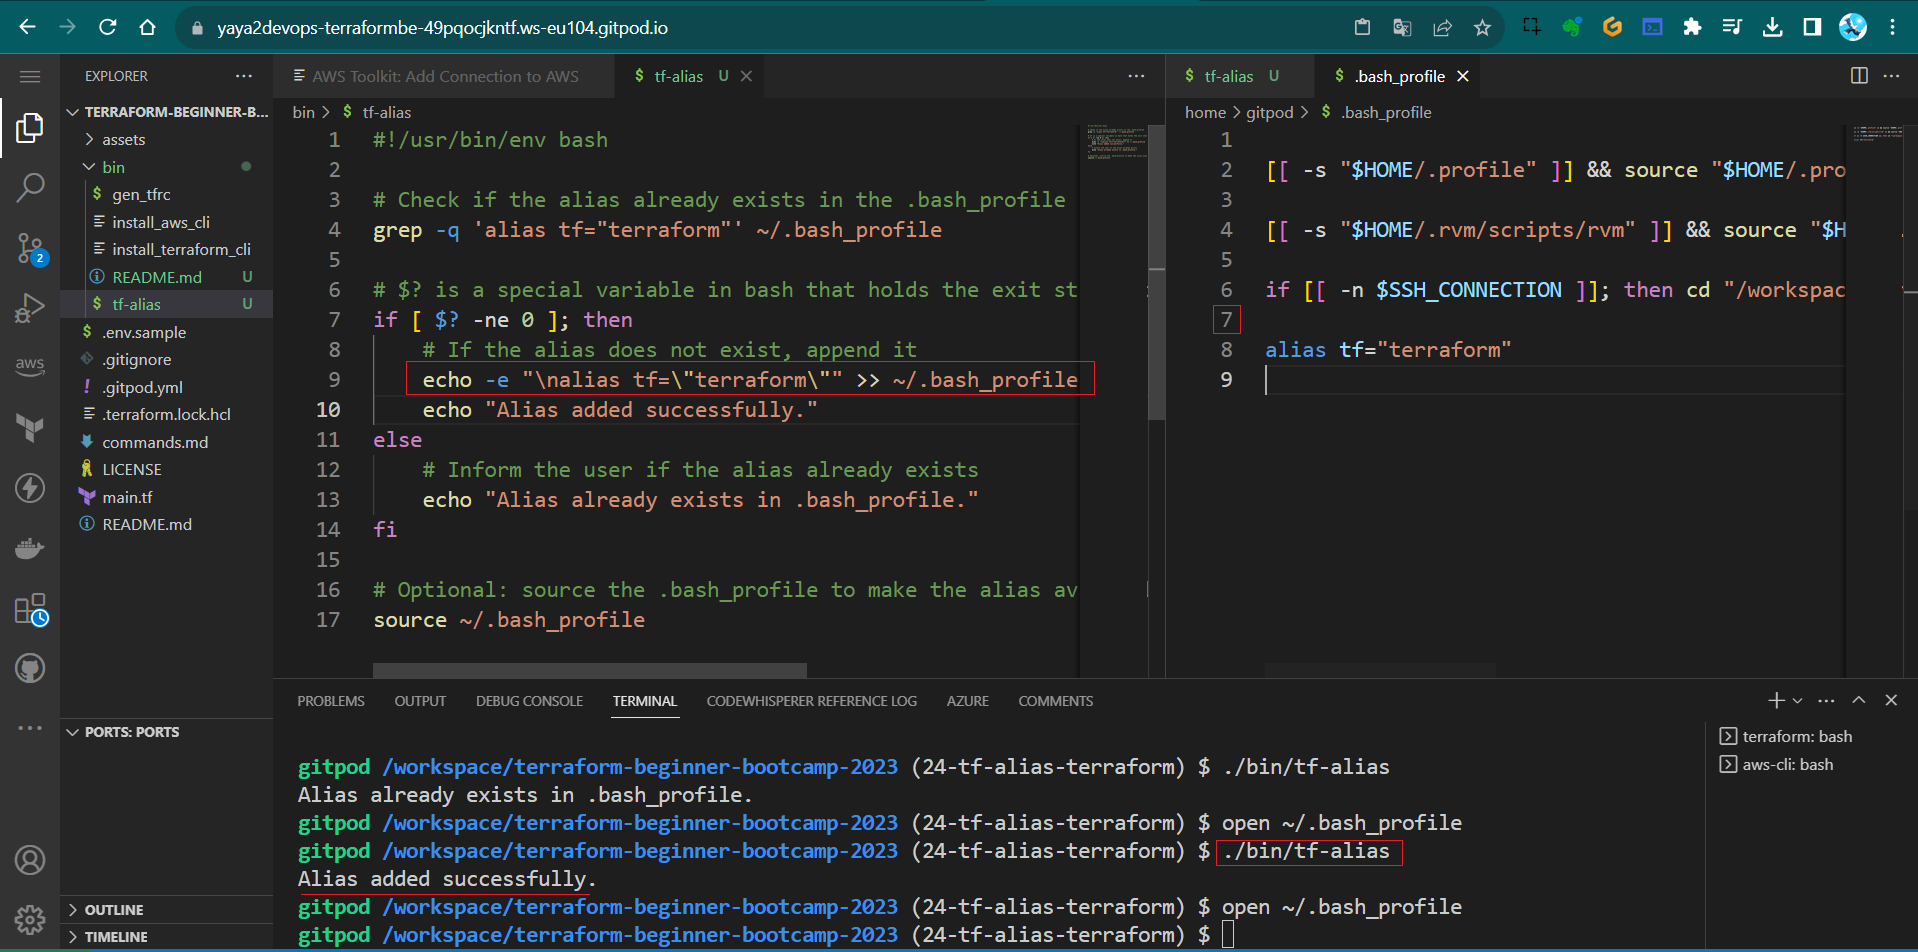
echo -e "\nalias tf=\"terraform\"" >> ~/.bash_profile
Instead of what it previously was;
echo 'alias tf="terraform"' >> ~/.bash_profile
- Save your changes by pressing
Ctrl + O, then pressEnter.
Step 2: Making the Script Executable
You need to make the script executable. Run the following command:
chmod u+x ./bin/tf_alias
Step 3: Executing the Script
Now, you can execute the script to add the alias to your .bash_profile. Run the following command:
./bin/tf_alias
The script will automatically add the Terraform alias to your Bash profile and update it.
Section 3 Using the Alias in Gitpod
Step 1 : Integrating with Gitpod
If you’re using Gitpod, you can integrate the alias in both AWS and Terraform blocks to ensure it’s available in both terminals.
- In your Gitpod configuration file (
.gitpod.yml), add the following lines to both the AWS;- name: aws-cli env: AWS_CLI_AUTO_PROMPT: on-partial before: | source ./bin/tf_alias - And Terraform blocks;
  - name: terraform
 before: |
   source ./bin/tf_alias
This wont generate double alias line. Tested.
- Save the
.gitpod.ymlfile. Now, every time you start a Gitpod workspace;- the alias will be automatically set up in both AWS and Terraform environments.
- You can now use
tfinstead ofterraformin your commands
- Restart your workspace and observe.
This is 0.9.0 making your Terraform workflow more efficient and user-friendly.
Week Cipher Conquests
This initial ignite been an exhilarating and enlightening experience as we delved into the foundational aspects of AWS and Terraform.
We hope you didn’t overlook anything, or else I might get upset.
The instructors have been exceptionally dedicated, leaving no stone unturned to ensure that we grasp every essential concept.
As we move to the next chapter, I look forward to celebrating your progress.
Let’s go. One step more.